
 Remember the Scrap Paper Pack Challenge I posted about several weeks ago? Well, the projects are in! I am so excited to share how 5 people made a bunch of fabulous, different projects! I LOVE seeing people's ideas, their takes on tutorials and how they make them their own, and their creative process.
Today we will look at three people's projects - Jessica, Katie and Nancy. Tomorrow will feature two more people - Elisa and Claire.
I want to thank each of the participants for participating - for their time and effort in creating, taking pictures, and sending them with explanations. Thank you ladies! :)
Jessica from Blueheart Boutique +Shop +Blog
Project 1: Coptic Journal
I used a flash card, some maps, and some other blue paper to try and make a coptic stitch journal. Turns out I need some practice, but I love the way the pieces of map look inside. I used this tutorial after seeing it here.
Project 1: Coptic Journal
I used a flash card, some maps, and some other blue paper to try and make a coptic stitch journal. Turns out I need some practice, but I love the way the pieces of map look inside. I used this tutorial after seeing it here.


 Project 2: Mini Notebooks
I decided to make three mini notebooks using scrap pieces from the pack. I made them 3X4" tall and although I didn't follow the exact instructions, I got inspiration from this tutuorial.

 Project 3: Star Garland
This star garland was my favorite project. I used this tutuorial to make the stars and then glued on some chipboard letters I had. BHB for Blueheart Boutique. And lastly I punched holes in the top with an awl and tied some embroidery floss through it.

 ++++
++++Katie from Gadanke +Shop +Blog
The month of June brought some really enormous steps in my life: my husband and I moved from Berlin, Germany to the United States, I committed myself to making my online journal shop - Gadanke - truly succeed, and I started a creative business journal to address my fears and plans and whispers coming from my heart about Gadanke.
When I received a packet of mixed papers and elements, I thought I would incorporate them into a minibook l from my shop, documenting the culture shock and transition of moving back home. My heart didn't agree. I am committed to my dream of creating a successful creative business. I needed a space to listen to my inner hopes. Adding elements from the mixed paper kit I received felt like the perfect element to really heighten my journaling and expressing my thoughts clearly.
Below are pictures of my initial setup before I start journaling. Everything changes pretty quickly as I get going. Just like in my journal shop, I start with a little prompt, which are noted below each picture since the resolution here isn't crystal clear.

Plan, plan (and a list); where is this journey taking me? what will i see?
launching my dream
Augustus was afraid to move. Something was pushing against the door. Something wanted to get in. {fear}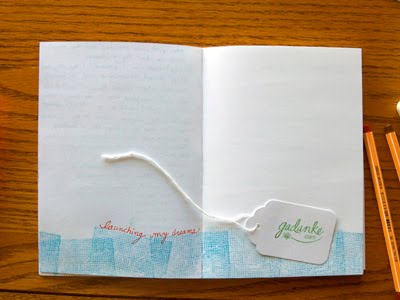
launching my dream


why is my heart telling me to do this?

success is about knowing what you want
++++{listing what I want to achieve}
Nancy from Quilting Potpourri +Blog
Project 1: Write Down Your Dreams Journal - A simple, small folded journal
A friend mentioned recently that she'd read a book which suggested that women write down their dreams and goals. I translated that concept of personal reflection into an 8-page journal that is very easy to make. The instructions for folding a single 12” square of scrap-booking paper is shown on YouTube at “One Page Wonder Mini Book” (see below). Once folded, I designed each page to include stitched elements as well as paper bits, stamping, and ribbon.
An alternate title for this journal might be the “25-cent Journal” because I found this appealing dotted paper on sale for a quarter, and nearly all of the rest of the elements came from Ashley's Scrap Paper Challenge Packet. This small journal contains plenty of places to write down dreams, along with encouraging words and verses. One page is a variation of Ashley's Notepad. I stitched several sheets of paper topped with ribbon on the page to provide more writing space. The journal is a nice keepsake to make for a daughter, a friend, or yourself.
A tip for making your own: I found it useful to make a model of the book from a smaller square of scrap paper first. After folding, making one slice, and assembling the journal, I then numbered the pages from front to back. Next, I unfolded the model to use it as a reference when laying out the pages. The photos show that page 8 is adjacent to page 1; and that pages 2-5 have a different orientation than pages 6-8, and 1. They look upside down when viewed before folding. I also marked the model with placement of adhesive strips which close the journal.


Project 2: Faded Denim Star
It's created using fabric paper made with lots of torn and cut bits of the text paper and sheet music sent in the scrap pack. The pieces were applied to plain muslin fabric using a glue wash. Once dry, I painted it with acrylic paints. Next I stitched the fabric paper using decorative machine stitches, cut the pieces and sewed them to make a 2-sided ornament. The hanger is braided 6-strand embroidery floss. The blue fabric paper took on a faded denim look from the white stitching and white paper.
I first learned about fabric paper from an online book study of Stitch Alchemy by Kelli Nina Perkins.

Stay tuned for Part 2 of the Scrap Paper Pack Challenge tomorrow. Have a fabulous day! :)
I'm at a loss of word. Those projects are just so overwhelming! Thanks for sharing
ReplyDeleteWhat beautiful projects. It's neat to see everyone's creations!
ReplyDeletevery cool!
ReplyDeleteLooks like you had to really stretch the photos I sent. Would have sent bigger ones if I'd known. Oh well. Love looking at/reading about what people came up with. What a great project!
Katie
oh my gosh - I cannot wait to see tomorrow's projects, too. This is great, Ashley. What a beautiful idea.
ReplyDeleteThis was great fun, and I love all the projects. Thanks Ashley.
ReplyDeletethanks so much for letting me be a part of this! i loved it! so many beautiful projects today and i'm so excited to see what you have for tomorrow! :)
ReplyDeleteIm so bummed I missed this challenge! But those entries look great!
ReplyDelete