I purchased a tile magnet at a craft show I was in a couple years ago. It had a lovely image of vintage flowers somehow transfered onto it. Unfortunately, it fell off the refrig one too many times and now sits in a basket on my desk in about a million pieces (I can't bear to throw it out). I decided to start hunting for a tutorial on how to transfer images to basic bathroom tiles and couldn't really find anything that didn't require purchasing a type of chemical/adhesive help I did not already have. So I tried just using ModPodge and it was a fail. An epic fail. Half of the image transferred, and then peeled right off. So I thought I would try to ModPodge the printed images straight to the tiles.

I decided to just go with it and start using different materials to see what would work and look best - I used the printed images from here, here and here, vintage sheets and clothing I found at a thrift store, and washi tape, and all three turned out great. I also found sheets of magnetic material at the thrift store (random, right?!).
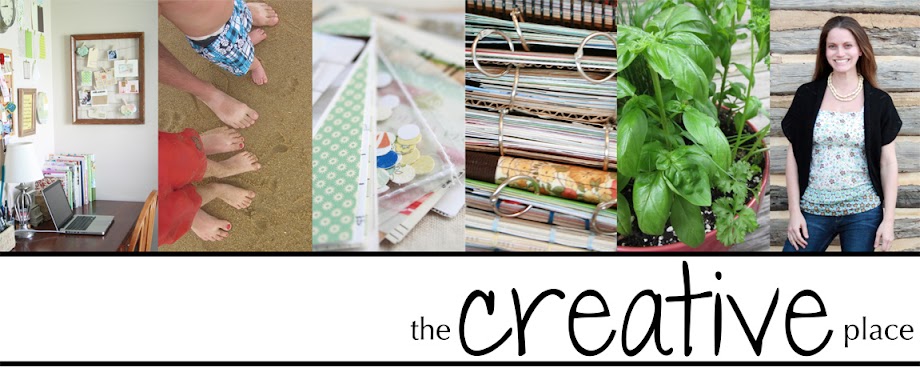
These little magnets are super cute, super inexpensive to make, and of course, super fun to make. I purchased a sheet of 2"x2" tiles (they come in sheets of 36, glued together for about $3.25) from a home improvement store and then broke them apart at the glue (*edited: they come apart fairly easily by bending them back and forth at the glue) and trimmed off the excess glue with an x-acto knife.
Materials:
- 2"x2" bathroom tiles
- ModPodge and foam brush
- Magnets (you can buy this on a roll, usually at craft stores)
- Glue (super strong, for adhering the magnet - I recommend Gorilla Glue)
You can use any of these (or all of them!)
- Fave papers, cut down to 2"x2"
- Fabric (either new or repurposed clothing, sheets, etc. I recommend using a fairly light-weight fabric, so that the ModPodge will hold it - ie. no upholstery)
- Washi tape
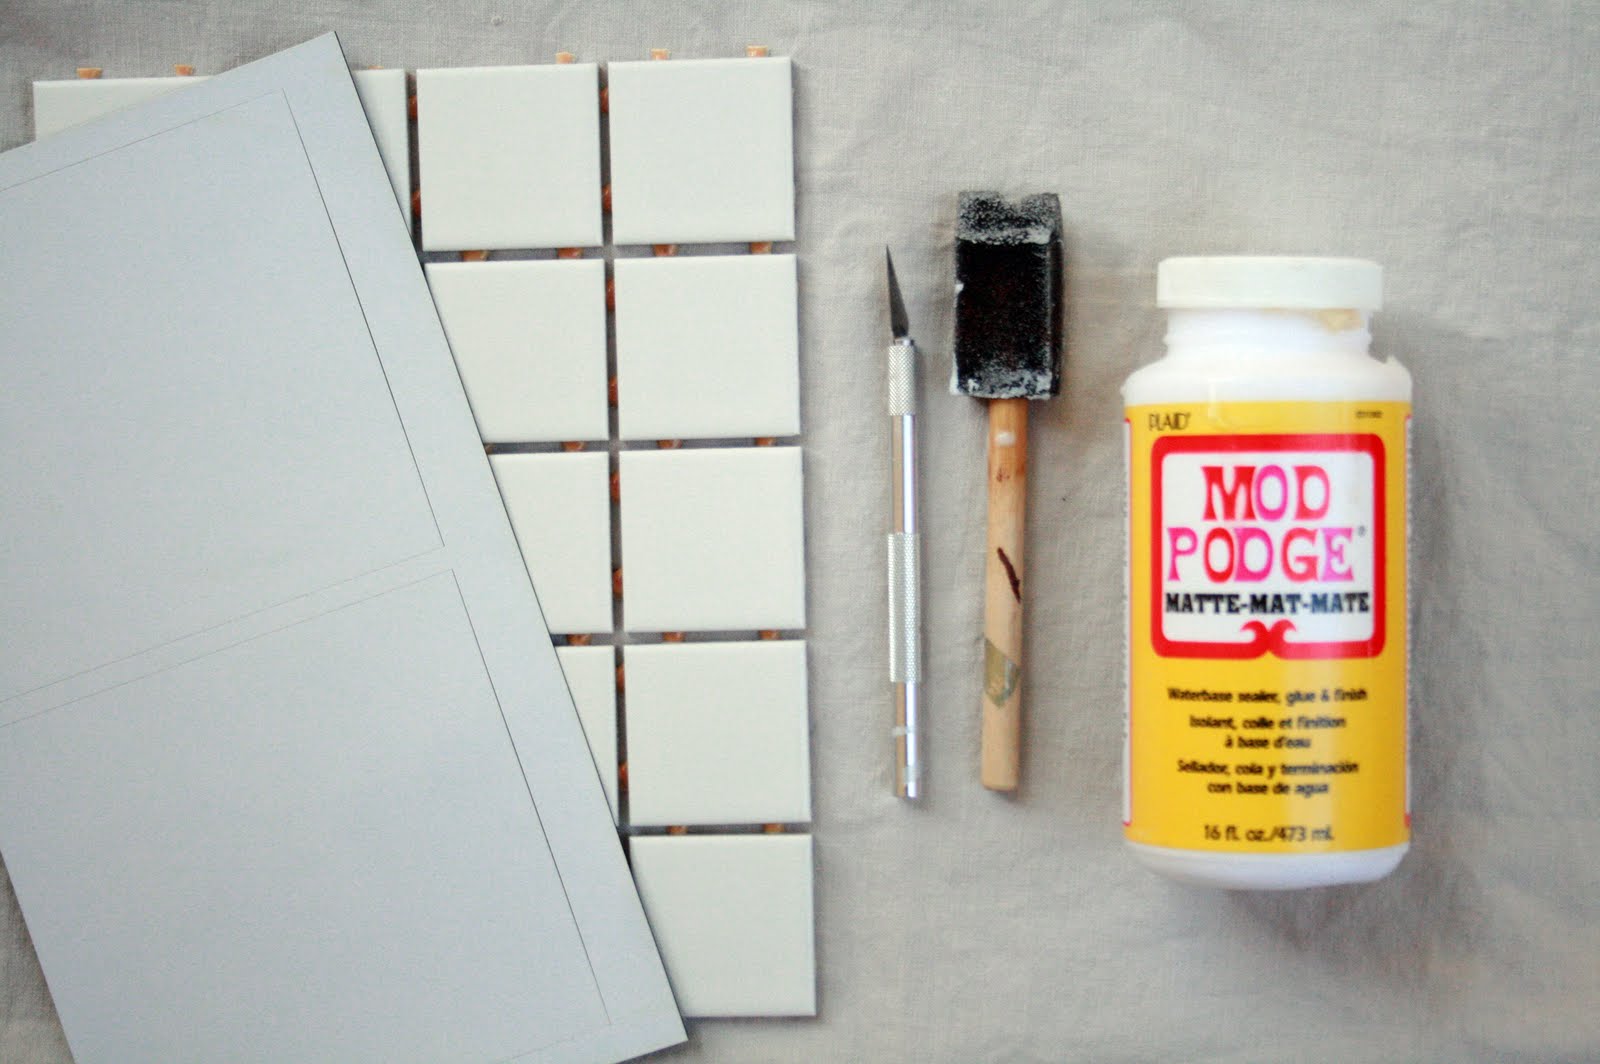

If you are using paper or fabric: Using the foam brush, apply a thin layer of ModPodge over the top of the tile. Adhere the 2"x2" piece of paper or fabric and gently smooth out any air bubbles. Apply another thin layer of ModPodge over the paper or fabric and around the edges of the tile to smooth out - this will ensure there are no edges of paper or fabric hanging off of the tile. Let dry completely.
Then glue a magnet onto the back, and voila! A fun magnet to add some lovely to your refrig. You could also print out letters, a quote or Scripture and adhere that to the tile. What an easy, inexpensive, but thoughtful gift! :)

Love this and I will have to try it!! I pinned you on pinterest!!
ReplyDeletehttp://pinterest.com/pin/132318871/
Our kids love to play with magnets. We have painted a wall with Cin magnet ink in their play room were they usualy play with magnet dolls, clothes and little magnet panels. We will use your tip to make same tile magnets with them.
ReplyDeleteThanks for sharing.
www.amamima.com
I just had to "pin" this!
ReplyDeleteI love this idea. I see lots of learning opportunities for my girls and lots of gift ideas.
Thanks.
This is great. I like the idea of printing letters- you could make a whole set of "alphabet tiles" to help a little one always see them on the refrigerator.
ReplyDeleteThanks for sharing this great project. I've used the same technique to make coasters but not magnets. Another project to add to my to-do list.
ReplyDeleteWhat a nice idee i use the tiles fore mozaiek but this is also a very good idee .... Gr. Gerd@
ReplyDeleteThis is great! I Love it!
ReplyDeleteThanks for sharing this great idea.
Do you have any suggestions for breaking the tiles apart?
ReplyDelete@ Lindsey- the tiles break apart fairly easily at the glue. The glue just needs to be trimmed down with an exacto blade :)
ReplyDeleteI love this idea, so creative, thanks for sharing.
ReplyDeleteFabulous. I gotta get me some tiles!
ReplyDeleteLove this, need to try! What magnets did you use? They don't look big and bulky like the ones I have. Are they pretty strong?
ReplyDeleteWould this work using pictures? Thanks!
ReplyDeleteI just tried making these, and they turned out great! I used some scrapbooking paper that had a watercolor look to it. Thank you for the straight-forward instructions and photos. I'm not that creative or great with crafts, so this felt like quite an accomplishment! I'm going to check out the rest of your site for more inspiration.
ReplyDeleteSo cute! Where do you get your washi tape?
ReplyDeleteGreat idea. Def. going to attempt. :) It's always nice coming accros inexpensive projects my kids & I can do together. Thinking of usng to teach myittle one her sight words & shapes. With my oldest we have so many options. Thanks once again.
ReplyDeleteThis would be a project I plan to try out. I plan to make a dishwasher dirty dishes/clean dises magnet for my mother. It would be big enough for her to see the words!
ReplyDeleteYour tile magnets tutorial is very good and very easy to do . Materials also will use what ever available at home no need to buy more except glue and magnet. That's a great idea. I am surely try this. Tiles Online | CPVC Pipes
ReplyDelete